Graveyard Brownies
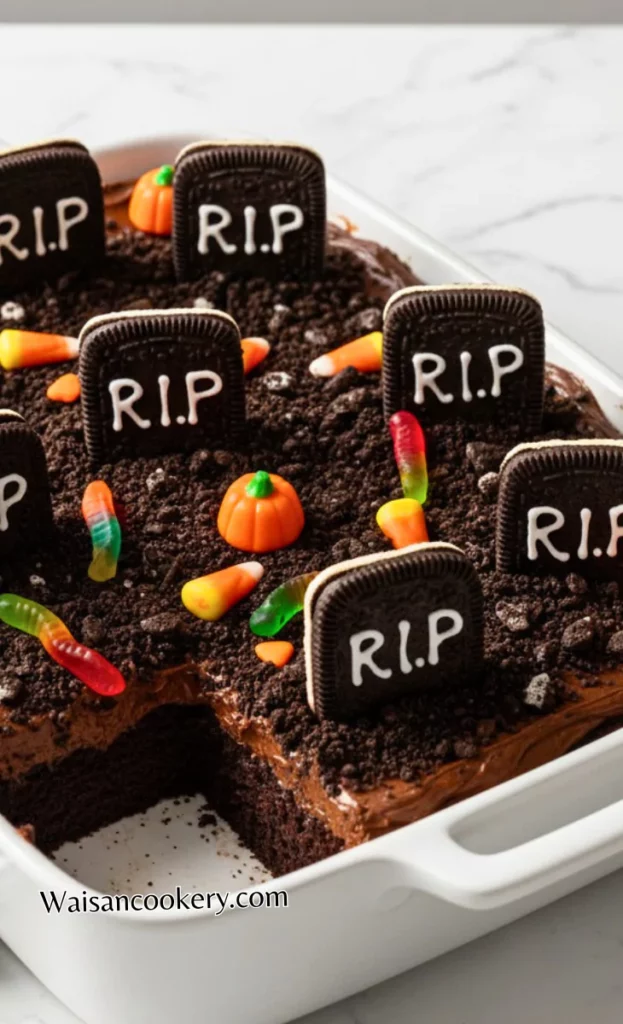
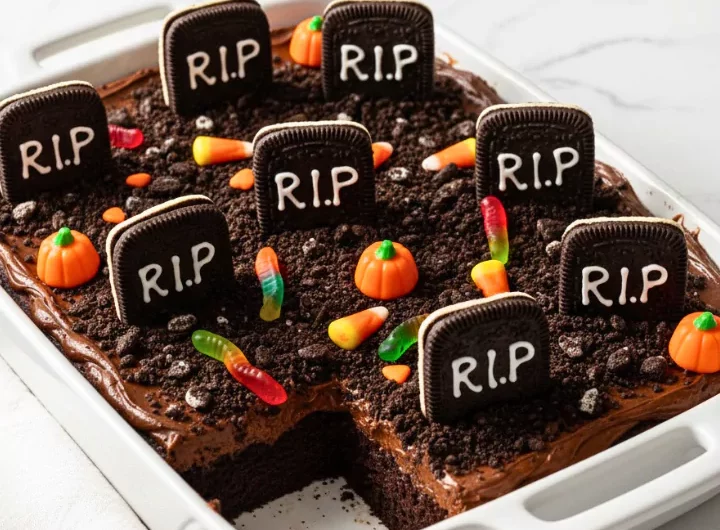
My kids love the cookie tombstones and candy decorations on these Graveyard Brownies. A dark chocolate base, a little cookie dirt, and a few gummy worms turn an ordinary pan of brownies into a small Halloween scene.
I have been making these for a few years, using boxed brownie mix to keep the baking simple. The crushed cookies are my favorite finishing touch because they give the frosting a rough, earthy look without careful piping.
This pan makes twelve decorated portions. Most of the work is easy assembly, but leave enough time for the brownies to cool completely and the finished decorations to settle before you cut and serve them.
Why This Dish Is Great
- A boxed mix handles the brownie base, leaving more time for the tombstones and candy details that make the dessert special.
- Chocolate frosting holds the crumbs in place and gives the cookies a little support where they meet the brownie surface.
- Twelve tombstones make it easy to plan twelve portions, with one cookie centered on each piece instead of sitting across a cutting line.
- The whole scene can stay in its baking pan for a casual party. There is no need to stack layers or move a tall cake.
- Decorations can be gentle and playful, with pumpkins and ghosts, or a little spookier with candy bones and gummy hands.
- The plain brownies can be baked ahead. Keeping the cookies separate until decorating helps them stay crisp and makes transport easier.
Choosing The Best Brownie Mix
Choose a box labeled for a 9×13-inch pan. Smaller mixes make a thinner layer in that pan and may not support the tombstones well. Read the back before shopping, since the required eggs, oil, and water depend on the mix you choose.
Follow that package for oven temperature, mixing, and doneness. A chewy or fudgy brownie works nicely, but it still needs to be fully baked. Raw brownie mix and batter are not safe to taste, so save the spoonfuls for the finished dessert.
Ingredients
- 1 box brownie mix (plus eggs, oil, and water as required)
- 12 Milano cookies or rectangular sandwich cookies (for tombstones)
- 1 cup chocolate frosting
- ½ cup crushed chocolate cookies (like Oreos, for “dirt”)
- Candy pumpkins, candy corn, or gummy worms (for decoration)
- White gel icing (for writing on tombstones)
Measure the crushed cookies after crushing them. Keep the twelve whole tombstone cookies separate from the crumb topping, and choose chocolate frosting that spreads smoothly without being runny. Candy amounts are flexible because they decorate the surface rather than change the brownie batter.
Kitchen Equipment You Will Need
As an Amazon Associate I earn from qualifying purchases.
- 9×13-inch baking pan
- Mixing bowl
- Measuring cups
- Measuring spoons
- Mixing spoon
- Spatula
- Wire cooling rack
- Resealable food bag
- Piping bag
- Sharp knife
How To Make Graveyard Brownies
Allow about 3 hours 25 minutes: 25 minutes of active preparation and decorating, about 30 minutes of baking, up to 2 hours of cooling, and 30 minutes for the decorated pan to chill. Baking and cooling vary with the mix, pan, and room; wait until the center is completely cool before frosting.
Step 1
Bake the brownies: Choose a mix suitable for a 9×13-inch pan. Preheat the oven to the temperature on its package and prepare the pan as directed. Mix with the package amounts of eggs, oil, and water, then bake for the package's 9×13-inch timing, about 30 minutes as a planning estimate. Use its doneness test and continue baking if wet batter remains. Cool in the pan on a wire rack until completely cool, allowing up to 2 hours. Do not taste raw batter.
Step 2
Frost the surface: Spread all 1 cup chocolate frosting evenly over the cooled brownies. Crush the chocolate cookies in a resealable food bag and measure ½ cup crumbs. Scatter all the measured crumbs across the frosting, leaving an uneven dirt-like surface.
Step 3
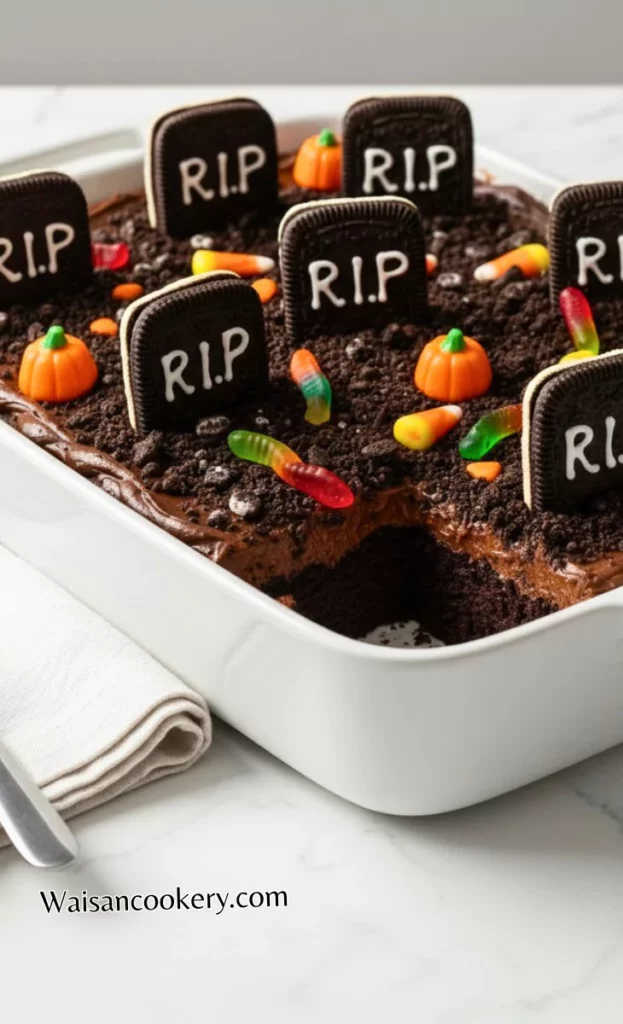
Make the tombstones: Use white gel icing to write short words such as RIP on all 12 Milano or rectangular sandwich cookies. Let the writing settle while you plan a three-by-four arrangement. Gently press the bottom of one cookie into the brownie at each portion's center, deep enough to stand without forcing it through the base.
Step 4
Decorate the scene: Arrange candy pumpkins, candy corn, or gummy worms around the tombstones. Keep the intended cutting lines clear. Refrigerate the decorated pan for 30 minutes to firm the frosting; a cookie that still leans may need a slightly deeper opening rather than more pressure.
Step 5
Cut and serve: Use a sharp knife to cut the pan into 12 portions around the tombstones. Wipe the blade between cuts and lift each piece from underneath with a spatula. Alternatively, cut the cooled brownies before decorating and add one tombstone to each square.
Notes
- Touch the middle of the brownie slab before frosting. Cool edges can hide a warm center that would soften the frosting and loosen the decorations.
- Use sturdy cookies with enough length to stand above the surface. Hold each cookie close to its base while inserting it so the top does not snap.
- Write on the cookies while they lie flat. Keep lettering short and allow it to settle before handling; gel icing may remain soft rather than drying hard.
- For a firm brownie top, make a small slot with the knife before inserting a cookie. The slot should support the cookie snugly rather than leave a wide gap.
- Crush the dirt cookies into a mix of fine crumbs and small pieces. Large chunks are harder to scatter evenly and can pull frosting away when cutting.
- Let children add candy to the fully cooled, baked dessert while an adult handles the oven and knife. Wash hands and utensils after handling raw batter.
- Carry the brownies in their pan with a tall cover. For a bumpy trip, pack the tombstones separately and add them at the destination after the pan is steady.
Ingredients You Can Add
- Gummy worms can curl around the tombstones or disappear partly under the cookie crumbs. Add them after the frosting so they remain visible.
- Candy bones make small patches of decoration. Scatter them between portions instead of across the places you plan to cut.
- Marshmallow ghosts can sit on the frosting near the back of the pan. Choose small shapes so they do not hide the tombstones.
- Candy pumpkins add orange color to the dark crumbs. Cluster a few in a corner for a small pumpkin patch.
- Green coconut flakes can look like grass. Toss shredded coconut with a little green food coloring in a food bag, then sprinkle it sparingly over the crumbs.
- Chocolate chips or candy rocks can outline a little path. Keep the pieces edible and choose decorations appropriate for the people eating the brownies.
What To Serve
Serve the pan after a Halloween dinner of Jack O’Lantern Stuffed Peppers. The carved peppers and cookie graveyard share a playful theme while keeping dinner and dessert easy to recognize.
For a party with small plates, Eyeball Meatballs provide a savory choice before the brownies. Keep each dish on its own serving tray so sauces and chocolate crumbs stay separate.
Add Monster Rice Krispie Treats for a crisp, chewy contrast on the dessert table. Put brownie portions on small plates and offer milk, coffee, or water alongside the sweet decorations.
Recipe Variations And Swaps
- Pumpkin patch: Arrange candy pumpkins in rows and pipe green frosting vines around them. Leave enough dark cookie dirt showing to keep the garden effect.
- Spider brownies: Use a round chocolate candy for the body and short pretzel pieces for legs. Press them gently into frosting so they do not roll off.
- Ghost brownies: Set a marshmallow on each portion, cover it with white frosting, and add black gel eyes. Keep the finished ghosts chilled if the frosting requires refrigeration.
- Zombie brownies: Tuck edible gummy hands or candy fingers into small openings in the brownie. Avoid forcing thick candy pieces into the same opening as a tombstone.
- Mummy brownies: Pipe white icing back and forth across individual squares, leaving a small gap for candy eyes. Decorate after cutting for cleaner bandage edges.
- Candy corn brownies: Press candy corn into the frosting around each cookie. A few pieces give color without covering the crumb texture completely.
- Skeleton brownies: Use candy bones or draw small skeleton shapes with white icing. A simple head and crossed bones are easier to fit on one portion.
- Witch brownies: Join chocolate kisses and small cookies with a dab of frosting to form hats. Add green icing details, keeping the hats low enough for the storage cover.
How To Store
Keep decorated brownies in a covered container tall enough for the cookies. They can stay at cool room temperature for up to two days only when the frosting and every topping are suitable for room-temperature storage; follow their labels. Cream cheese frosting, whipped cream, or other perishable toppings require refrigeration at 40°F or below.
For a simple cautious option, refrigerate the covered brownies and use within three to four days. Cookies soften as they absorb moisture, so add fresh tombstones shortly before serving when possible. Wrap undecorated brownies tightly for longer storage following the mix’s guidance. Discard brownies with perishable toppings left out over two hours, or one hour above 90°F.
FAQ
Can I use homemade brownies?
Yes, use a complete brownie recipe designed for a 9×13-inch pan and follow its baking directions. Cool the slab fully before adding the same frosting, crumbs, and decorations.
Why are my tombstones falling over?
The brownie may still be warm, the cookie may be too heavy, or its base may not be inserted deeply enough. A snug opening and the 30-minute chill help provide support.
Can I decorate them the day before?
You can frost and add crumbs ahead, then keep the pan covered as the frosting requires. Add the tombstones and delicate candies closer to serving for their best texture.
Should the brownie tester come out completely clean?
Follow the mix’s own doneness instructions. Some fudgy mixes leave moist crumbs on the tester, but a coating of wet batter means they need more baking.
How can I make cutting easier?
Cut the cooled brownies first, then frost and decorate each portion. If decorating the whole pan, plan twelve spaces and keep large candies away from the cutting lines.
Can children help with the decorations?
Yes, supervised decorating is a good job once the brownies are baked and cool. Choose candies suitable for their age, and keep raw batter, hot pans, and sharp knives with the adult.
Short Description
Graveyard Brownies turn a pan of chocolate brownies into a Halloween dessert with chocolate frosting, cookie dirt, twelve cookie tombstones, and colorful candy decorations.
Graveyard Brownies
Course: DessertCuisine: AmericanDifficulty: Easy12
brownies25
minutes30
minutes3
hours25
minutesGraveyard Brownies turn a pan of chocolate brownies into a Halloween dessert with chocolate frosting, cookie dirt, twelve cookie tombstones, and colorful candy decorations.
Ingredients
1 box brownie mix (plus eggs, oil, and water as required)
12 Milano cookies or rectangular sandwich cookies (for tombstones)
1 cup chocolate frosting
½ cup crushed chocolate cookies (like Oreos, for “dirt”)
Candy pumpkins, candy corn, or gummy worms (for decoration)
White gel icing (for writing on tombstones)
Directions
- Bake the brownies: Choose a mix suitable for a 9×13-inch pan. Preheat the oven to the temperature on its package and prepare the pan as directed. Mix with the package amounts of eggs, oil, and water, then bake for the package’s 9×13-inch timing, about 30 minutes as a planning estimate. Use its doneness test and continue baking if wet batter remains. Cool in the pan on a wire rack until completely cool, allowing up to 2 hours. Do not taste raw batter.
- Frost the surface: Spread all 1 cup chocolate frosting evenly over the cooled brownies. Crush the chocolate cookies in a resealable food bag and measure ½ cup crumbs. Scatter all the measured crumbs across the frosting, leaving an uneven dirt-like surface.
- Make the tombstones: Use white gel icing to write short words such as RIP on all 12 Milano or rectangular sandwich cookies. Let the writing settle while you plan a three-by-four arrangement. Gently press the bottom of one cookie into the brownie at each portion’s center, deep enough to stand without forcing it through the base.
- Decorate the scene: Arrange candy pumpkins, candy corn, or gummy worms around the tombstones. Keep the intended cutting lines clear. Refrigerate the decorated pan for 30 minutes to firm the frosting; a cookie that still leans may need a slightly deeper opening rather than more pressure.
- Cut and serve: Use a sharp knife to cut the pan into 12 portions around the tombstones. Wipe the blade between cuts and lift each piece from underneath with a spatula. Alternatively, cut the cooled brownies before decorating and add one tombstone to each square.
Notes
- Timing estimates 25 minutes active work, 30 minutes baking, up to 2 hours cooling, and 30 minutes chilling. Follow the brownie package's temperature, added ingredients, baking time, and doneness test for a 9×13-inch pan.
- All 12 whole cookies are tombstones; the separate ½ cup crushed cookies covers the frosting. Do not taste raw brownie batter.
- Store as the frosting and toppings require. Refrigerate perishable toppings at 40°F or below and limit time out to 2 hours, or 1 hour above 90°F.