15 Christmas Tree Ideas 2026
Every year, when I take the tree out of the box, I stand in the living room and think, “Okay, what do we do this year?” Some years I want the same cozy tree I grew up with. Other years I see a pretty photo online and I want to try something totally new. If you feel the same way, you are in the right place, friend.
For Christmas 2026, I put together 15 Christmas tree ideas that I truly love. There is a tree here for every style — classic, rustic, glam, minimal, fun for kids, and even a beach tree for my friends who live near the water. Some of these trees look rich and fancy, but trust me, most of them are easy and cheap to make with things from the dollar store and a little patience.
You do not need to buy everything new. Start with the ornaments you already have, pick one idea that makes your heart happy, and add a few small things to change the look. That is my secret every year. One new ribbon and two or three new ornaments can make an old tree look like a brand new tree — nobody will know, I promise.
For every idea below, I tell you what you need and the exact steps I follow, in the order I do them. Lights always go first, friends, that is rule number one in my house. After that, it is just layers: ribbon, big ornaments, small ornaments, and the pretty extras at the end. If you follow the layers, your tree will look good every single time, even if it is your first year decorating alone.
So grab a cup of hot cocoa, put on some Christmas music, look through these 15 ideas, and let us find your perfect tree for 2026.
Classic Red and Gold Traditional Tree
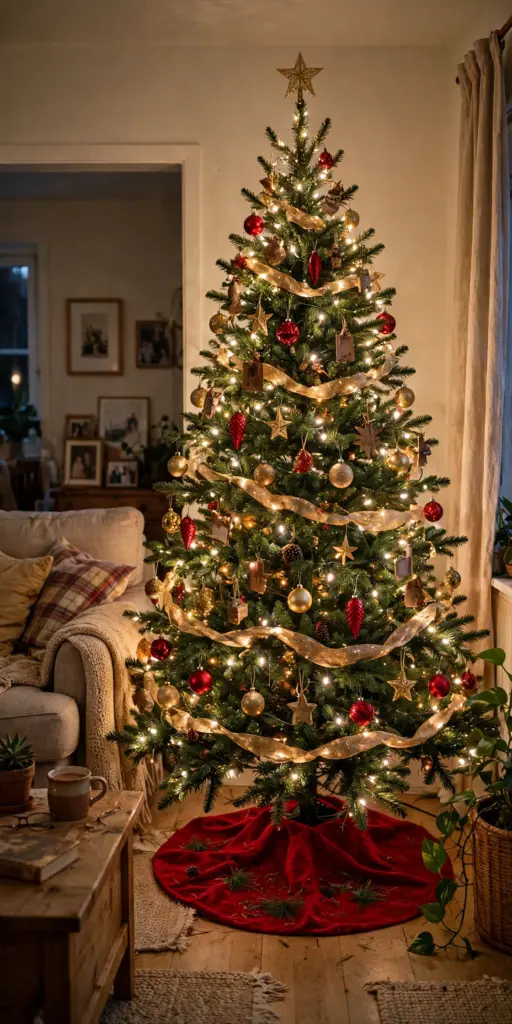
This is the tree from our childhood, and it never gets old. Deep red and warm gold together make the whole room feel cozy and rich, like a Christmas movie. If you want a safe, beautiful tree that makes everybody say “wow” when they walk in, this is the one. It matches almost any living room, it photographs beautifully, and you can use the same ornaments for many years because this style never goes out of fashion.
Theme: Traditional | Time to Decorate: 2-3 hours | Budget: $$ (medium)
What You Need
- Warm white string lights
- Red ball ornaments in different sizes
- Gold ball ornaments and gold icicles
- Red and gold ribbon, about 2 rolls
- Gold star or angel tree topper
- Red berry picks and gold pinecones
- A red or gold tree skirt
- A few special family ornaments
How to Do It
- Start with the lights. Wrap warm white lights from the bottom of the tree to the top, and push some lights deep inside the branches, not only on the outside. This makes the tree glow from the inside and look full and warm.
- Add the ribbon first. Cut your ribbon into pieces about 2 feet long. Tuck each piece into the tree in a soft wave, going down from the top. Ribbon looks best when you put it on before the ornaments, because the balls can sit on top of it.
- Hang the big ornaments deep inside. Take your biggest red and gold balls and hang them close to the trunk. This fills the empty holes in the tree and gives it depth, so it does not look flat.
- Fill the outside with smaller balls. Now hang the medium and small ornaments on the outer branches. Mix red and gold evenly, and step back every few minutes to check that one side is not too heavy.
- Push in the berry picks and pinecones. Stick the red berry picks and gold pinecones into empty spots. These little extras make a cheap tree look expensive, I promise you.
- Finish with the topper and skirt. Put your gold star or angel on top, spread the tree skirt under the tree, and turn off the room lights to enjoy the glow. If the topper leans to one side, wrap a little floral wire or a pipe cleaner around the top branch to hold it straight — a small trick that saves a lot of frustration.
Winter Wonderland White and Silver Tree
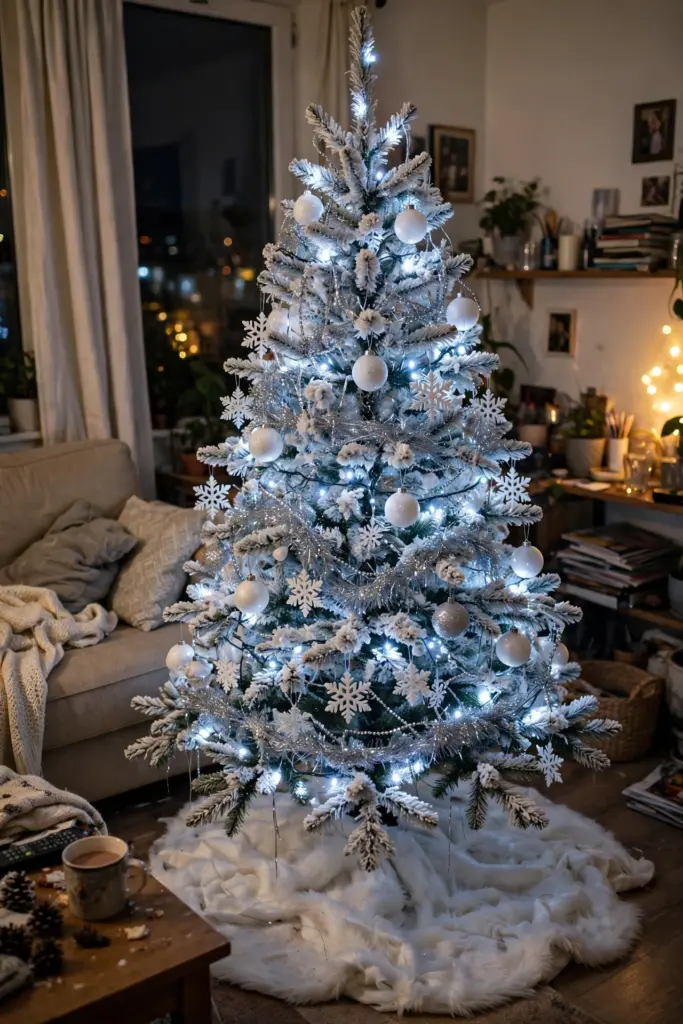
This tree looks like a quiet morning after fresh snow. Everything is white, silver, and sparkly, and the whole room feels calm and clean. It is perfect if your home has light colors, or if you just want something soft and dreamy this year.
Theme: Elegant Winter | Time to Decorate: 2 hours | Budget: $$ (medium)
What You Need
- Cool white or warm white string lights
- White ball ornaments, matte and shiny
- Silver ornaments and silver snowflakes
- White faux fur or white fabric tree skirt
- Silver ribbon or white mesh ribbon
- White feather picks or snow flocking spray
- Crystal or silver star topper
- Fake snow blanket for under the tree
How to Do It
- Fluff and light the tree. Open every branch slowly and make the tree look full. Then add your lights in a spiral from bottom to top, keeping them even so there are no dark spots.
- Add a touch of snow. If your tree is plain green, spray a little flocking spray on the branch tips, or tuck white feather picks inside. This small step gives you that snowy winter feeling.
- Hang white ornaments first. Put the white balls all over the tree, big ones inside and small ones outside. White on green already looks pretty, and it makes a clean base for the silver.
- Add silver for sparkle. Hang the silver balls and snowflakes next. Silver catches the light and makes the tree shine, so put the sparkliest pieces near the lights.
- Weave the ribbon softly. Let the silver or white ribbon fall in loose, soft waves down the tree. Do not pull it tight — soft and flowy is the look we want here.
- Top it and add the snow blanket. Put the crystal star on top, lay the fake snow blanket or white fur skirt at the bottom, and your winter wonderland is ready.
Rustic Farmhouse Tree with Burlap and Wood Ornaments
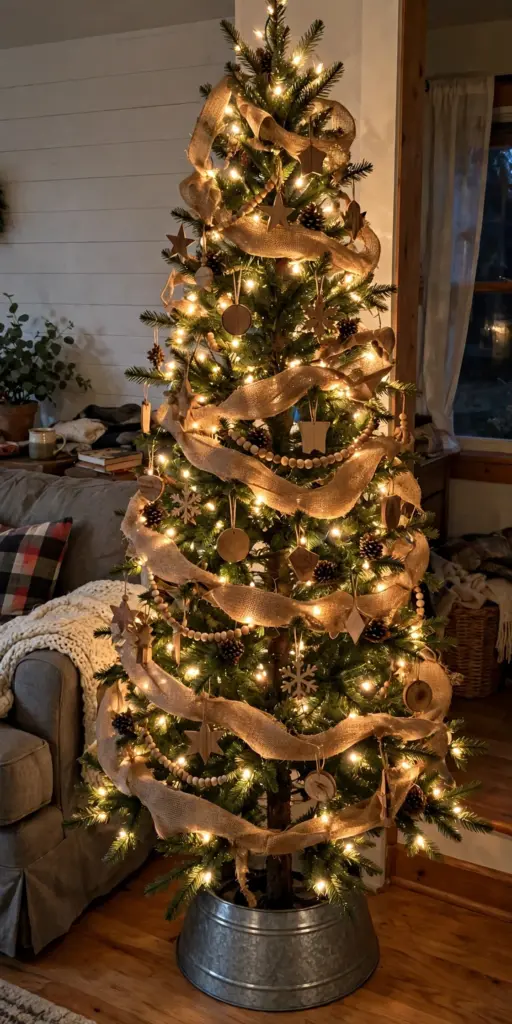
If you love cozy country style, this farmhouse tree will make you smile. Burlap, wood, and warm lights make it feel like a Christmas in a little farmhouse in the country. It is also one of the cheapest trees on this list, because you can make many of the decorations yourself.
Theme: Rustic Farmhouse | Time to Decorate: 2-3 hours | Budget: $ (low)
What You Need
- Warm white string lights
- Wide burlap ribbon or burlap garland
- Wood slice ornaments
- Wooden beads garland
- Pinecones, natural or lightly frosted
- Red and black small plaid ribbon for bows
- Galvanized metal ornaments or a metal star topper
- A burlap or plaid tree skirt
How to Do It
- Lights first, always. Wrap warm white lights around the tree. For a farmhouse look, warm light is very important — cool white light looks too modern for this style.
- Wrap the burlap garland. Take your burlap ribbon and wrap it around the tree in big, loose loops. Tuck it in and out of the branches so it looks soft and natural, not perfect.
- Hang the wooden bead garland. Drape the bead garland around the tree under the burlap, in gentle swags. If you do not have beads, a simple popcorn or cranberry string also looks great.
- Add wood and pinecone ornaments. Hang the wood slices and pinecones all over the tree. Spread them out evenly, and put the biggest pieces low and deep inside the tree.
- Tie small plaid bows. Make little bows from plaid ribbon and clip or tie them onto branch tips. These pops of red make the tree feel warm and happy.
- Finish with a simple topper. A metal star or even a big burlap bow on top is perfect. Put the plaid skirt under the tree, and add a wooden crate or basket nearby if you have one.
Scandinavian Minimalist Tree
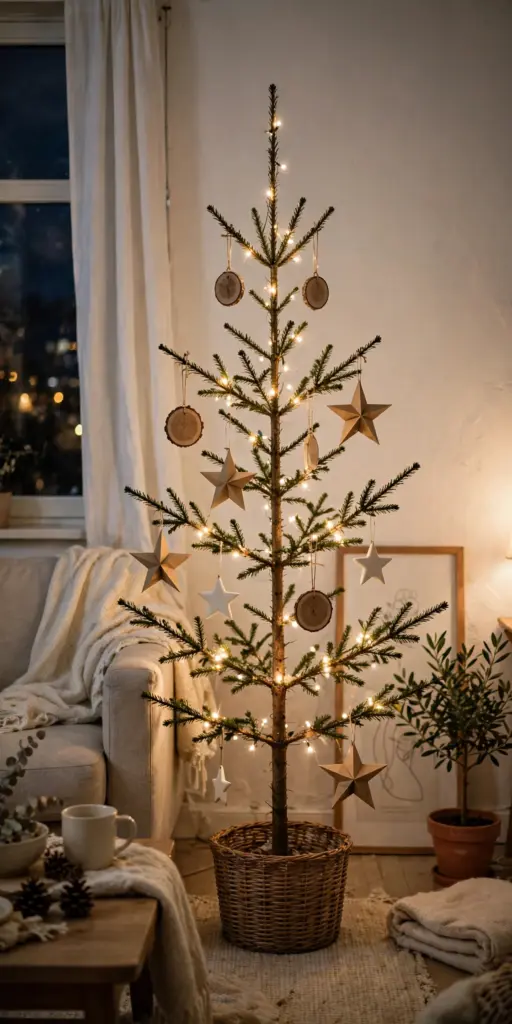
Scandinavian style is all about less is more. This tree has lots of empty space, a few simple decorations, and a calm, clean feeling. If big colorful trees feel like “too much” for you, this quiet and pretty tree might be your favorite. It is also the fastest tree on this whole list to put up and take down, which is a nice gift to yourself in busy December.
Theme: Minimal / Scandi | Time to Decorate: 1 hour | Budget: $ (low)
What You Need
- A green tree with a natural, open shape (or a sparse tree)
- Small warm white lights, one strand is enough
- White and light wood ornaments, only 15-25 pieces
- Paper ornaments or white paper stars
- A few straw ornaments
- A simple wood bead or paper star topper
- A plain white, linen, or woven basket tree collar
How to Do It
- Choose space over fullness. Fluff the tree gently, but do not worry about making it look thick. In Scandi style, you can see through the branches a little, and that is the beauty of it.
- Use fewer lights. Wrap just one strand of small warm lights. The glow should be soft, like candlelight, not bright like a shop window.
- Pick only a few ornaments. Choose your favorite 15 to 25 ornaments in white, cream, and light wood. If an ornament does not match these colors, it does not go on this tree — be strong, friend!
- Hang with lots of space. Leave big gaps between ornaments. Each piece should have room to breathe so your eye can enjoy one piece at a time.
- Add paper stars. Hang white paper stars and straw ornaments near the top and on the outer tips. These are traditional in Scandinavian homes and cost almost nothing.
- Keep the base simple. Put the tree in a woven basket or use a plain linen collar. No shiny skirt, no extra decor — clean and calm is the whole point.
Pink Blush Glam Tree
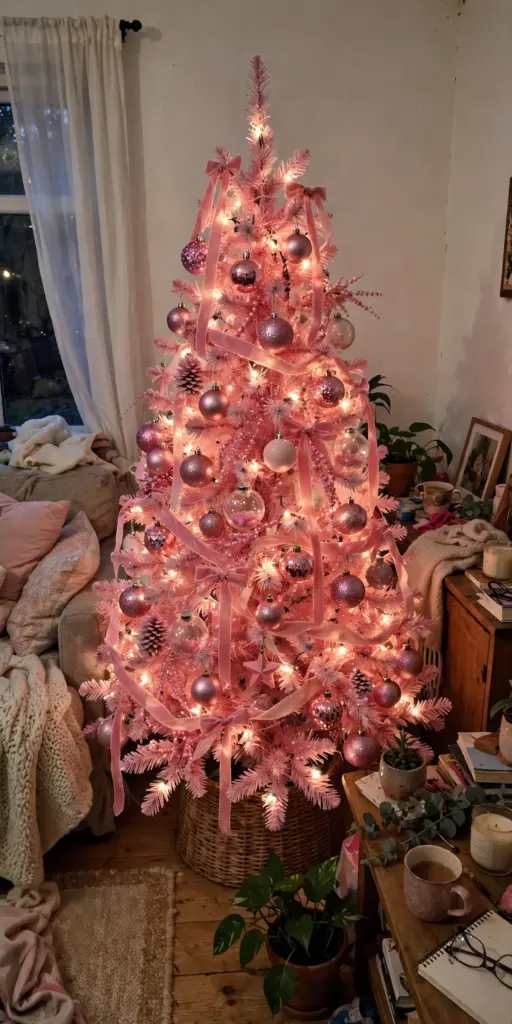
Pink trees are everywhere this year, and I understand why — they are so pretty and fun! Soft blush pink with gold and white looks sweet and fancy at the same time. This is the tree for you if you love glam style, or if you have a daughter who begs for a princess tree. You can do this theme on a green tree like I describe here, or on a white tree for an even softer, sweeter look — both are beautiful, so use the tree you already own.
Theme: Glam / Feminine | Time to Decorate: 2-3 hours | Budget: $$-$$$ (medium to high)
What You Need
- Warm white string lights
- Blush pink ball ornaments in many sizes
- Rose gold and gold ornaments
- White or cream ornaments to balance the pink
- Pink or gold glitter ribbon
- Pink flower picks, like peonies or roses
- A gold or crystal crown or star topper
- A white faux fur tree skirt
How to Do It
- Light it warm. Add warm white lights all through the tree. Warm light makes pink look soft and rich — cool light can make pink look grey, so be careful.
- Start with the biggest pink balls. Hang your largest blush ornaments deep inside the tree to build the pink base color. Spread them evenly on all sides.
- Layer gold and rose gold. Add the gold and rose gold ornaments next, mixing them between the pink ones. This mix is what makes the tree look glam and not like a candy shop.
- Add white to calm it down. Tuck in white or cream ornaments here and there. A little white keeps the pink soft and classy, especially near the top.
- Push in the flower picks. Stick pink flower picks into empty spots, mostly in groups of two or three. Flowers make this tree look like it came from an expensive shop.
- Ribbon, topper, and fur skirt. Weave the glitter ribbon in soft waves, put the crown or star on top, and finish with the white fur skirt for that soft glam look.
Blue and Silver Frosty Tree
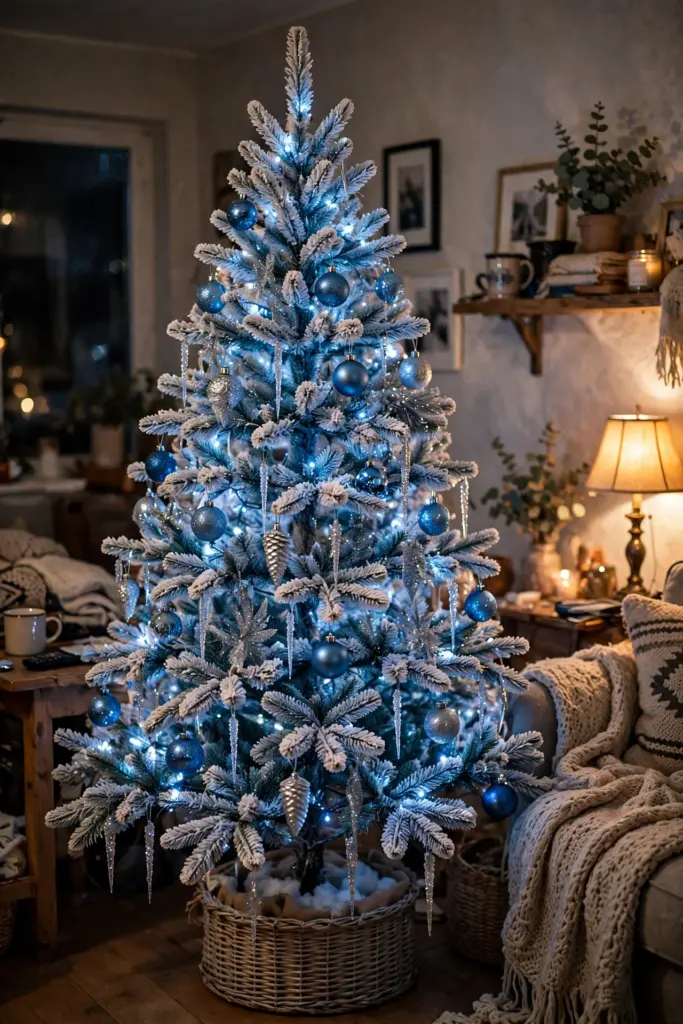
Blue and silver together look like ice and snow on a cold night — so fresh and sparkly. This tree is a great choice if you are tired of red and green but still want a winter feeling. It looks especially beautiful in a room with white or grey furniture.
Theme: Frosty Winter | Time to Decorate: 2 hours | Budget: $$ (medium)
What You Need
- Cool white string lights (these match blue best)
- Blue ball ornaments in light blue and dark blue
- Silver ornaments and silver snowflakes
- Light blue or silver ribbon
- Blue berry picks or icy branch picks
- A silver snowflake or star topper
- A silver or white tree skirt
How to Do It
- Use cool white lights. For this one tree, cool white is the right choice. It makes the blue look icy and clean, like real frost.
- Hang dark blue deep inside. Put the big dark blue balls close to the trunk. The dark color inside makes the tree look deep and full.
- Add light blue and silver outside. Hang light blue and silver ornaments on the outer branches. Mix them well so the tree sparkles from every side. A good trick is to hang three ornaments, step back, turn the tree a little if you can, and hang three more — this keeps the balance right all the way around.
- Weave the ribbon like ice. Let silver or pale blue ribbon fall in long, straight-ish waves from top to bottom, like icicles running down the tree.
- Tuck in icy picks. Push icy branch picks and blue berries into gaps, pointing a little upward. This gives the frosty, frozen look that makes this tree special.
- Top with a snowflake. A big silver snowflake or star on top and a silver skirt below will finish your frosty tree perfectly.
Vintage Retro Tree with Colorful Lights
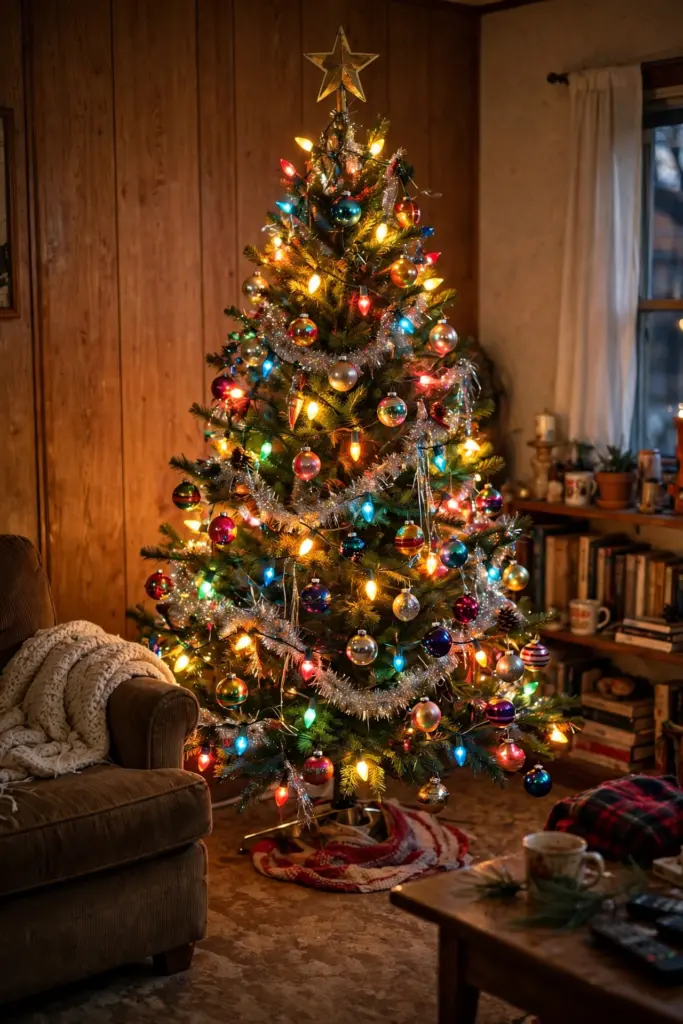
This tree is pure fun and pure memory. Big colorful lights, shiny bright ornaments, and lots of tinsel — just like grandma’s tree. If you want your kids to be excited and your guests to smile and remember their childhood, go retro this year.
Theme: Vintage / Retro | Time to Decorate: 1-2 hours | Budget: $ (low)
What You Need
- Multi-color string lights, big bulb style if you can find them
- Shiny ball ornaments in many bright colors
- Silver tinsel garland or loose tinsel icicles
- Old-style ornaments — Santas, reindeer, candy shapes
- Colorful ribbon or retro paper garland
- A silver star topper, the shinier the better
- Any old family ornaments you have saved
How to Do It
- Colorful lights go first. Wrap the multi-color lights around the whole tree. In retro style, the lights are the star of the show, so use plenty and spread the colors evenly.
- Add tinsel garland. Drape silver tinsel garland in big swags around the tree. Do not be shy — in the old days, more tinsel was always better.
- Hang the shiny bright balls. Put colorful shiny ornaments everywhere, mixing all the colors like a box of candy. There is no color rule for this tree, and that is the fun of it.
- Add the old-style ornaments. Hang your Santa, reindeer, and candy ornaments in the front where everyone can see them. These little characters tell the story of this tree.
- Finish with loose icicles. If you have loose tinsel icicles, throw small handfuls over the branch tips at the end. It makes a beautiful mess, just like the trees from the 60s and 70s.
- Top it with a shiny star. Put the silver star on top, step back, and enjoy the happy colors. This tree is not about perfect — it is about joy.
Woodland Forest Tree with Pinecones and Animals
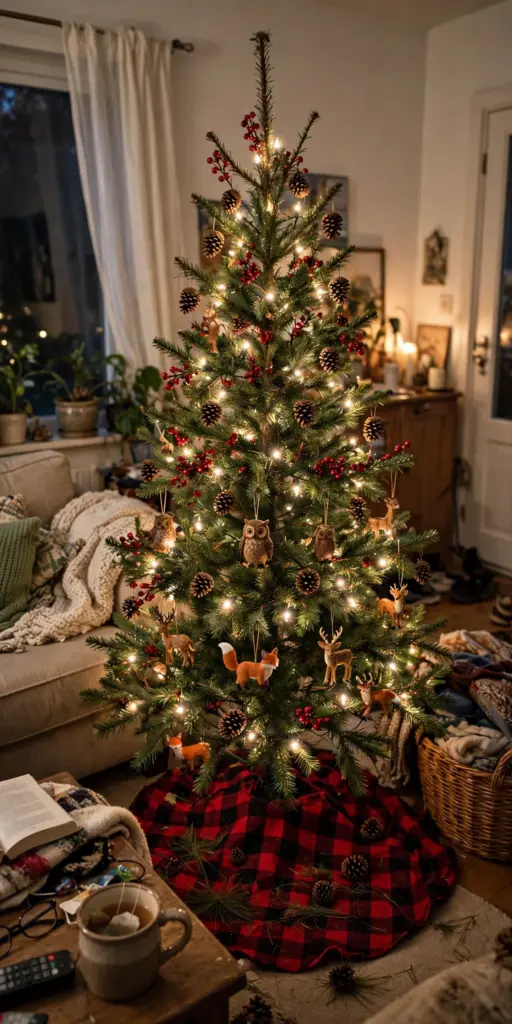
Imagine a walk in the forest in December — that is this tree. Pinecones, woodland animals, mushrooms, and lots of green and brown make it feel wild and cozy at the same time. Kids love finding the little animals hiding in the branches. You can collect real pinecones from your yard or a park for free, just bake them on low heat for 30 minutes first to clean them and open them up nicely.
Theme: Woodland / Nature | Time to Decorate: 2 hours | Budget: $ (low)
What You Need
- Warm white string lights
- Natural pinecones, many sizes
- Small woodland animal ornaments — owls, foxes, deer, bears
- Red mushroom ornaments
- Burlap or green ribbon
- Faux greenery picks, berries, and twigs
- A bird, owl, or wood star topper
- A brown or green tree skirt, or a basket collar
How to Do It
- Warm lights for a forest glow. Wrap warm white lights deep into the tree, like little fireflies in the forest. Keep some areas a little darker for a natural feeling.
- Add greenery and twigs first. Tuck faux greenery picks, twigs, and berry stems into the tree to make it look thicker and wilder, like a real forest tree.
- Hang pinecones everywhere. Pinecones are the main ornament here. Hang them with twine loops or just rest them on strong branches, big ones low and small ones high.
- Hide the animals in the tree. Place the animal ornaments in little “homes” inside the branches — an owl up high, a fox down low, a deer in the middle. Kids will love searching for them.
- Add red mushrooms and berries. The little red pops make the tree feel alive and give it that storybook forest look. Group two or three together in a few places.
- Finish with a nature topper. A cute owl, a bird, or a simple wood star on top, and a basket collar at the bottom, complete your woodland tree.
Peppermint Candy Tree (red and white)
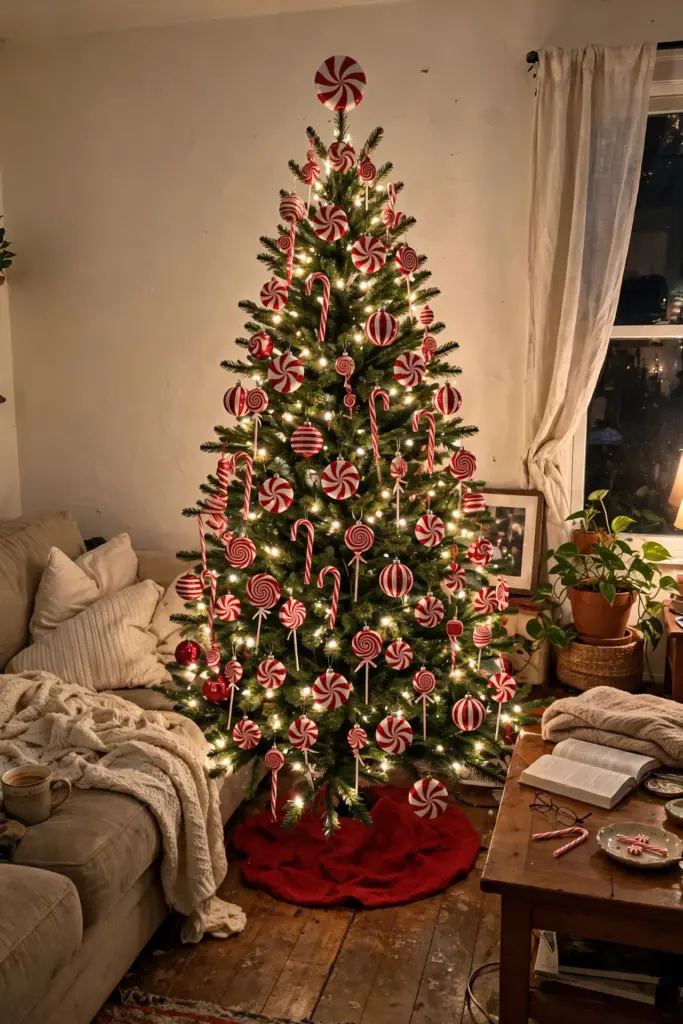
Sweet like candy! This red and white tree looks like a peppermint candy shop, and it makes the whole room feel happy. It is a great choice for a kitchen corner, a kids’ room, or anyone who loves a fun and bold Christmas look. If you do this tree in the kitchen or dining room, it looks extra cute with a few real candy jars and a plate of peppermint cookies on the table next to it — your guests will feel like they walked into a candy shop.
Theme: Candy / Fun | Time to Decorate: 2 hours | Budget: $$ (medium)
What You Need
- Warm white or red string lights
- Red and white ball ornaments
- Peppermint candy ornaments (flat round swirl candies)
- Red and white striped ribbon
- Candy cane decorations, real or fake
- White ornaments with red glitter
- A big lollipop or candy swirl tree topper
- A red or white tree skirt
How to Do It
- Start with the lights. Wrap warm white lights through the tree. If you want extra fun, mix in one strand of red lights too — the red glow makes the candy theme stronger.
- Make ribbon candy swirls. Take the red and white striped ribbon and twist it as you tuck it into the tree, in big loops going down. The twist makes it look like peppermint swirls.
- Hang red and white balls in a pattern. Alternate red and white ornaments as you go around the tree. A loose pattern keeps this tree looking clean and sweet, not messy.
- Add the peppermint candies. Hang the flat swirl candy ornaments on the outer branch tips where they show best. Put the biggest ones in front.
- Stick in the candy canes. Push candy canes into the tree pointing up and out, like they are growing from the branches. Group them in twos for a cute look.
- Top it with a lollipop. A big swirl lollipop topper is perfect here. Add the skirt, and your sweet candy tree is done — no eating the decorations, please!
Gold Glam Luxury Tree
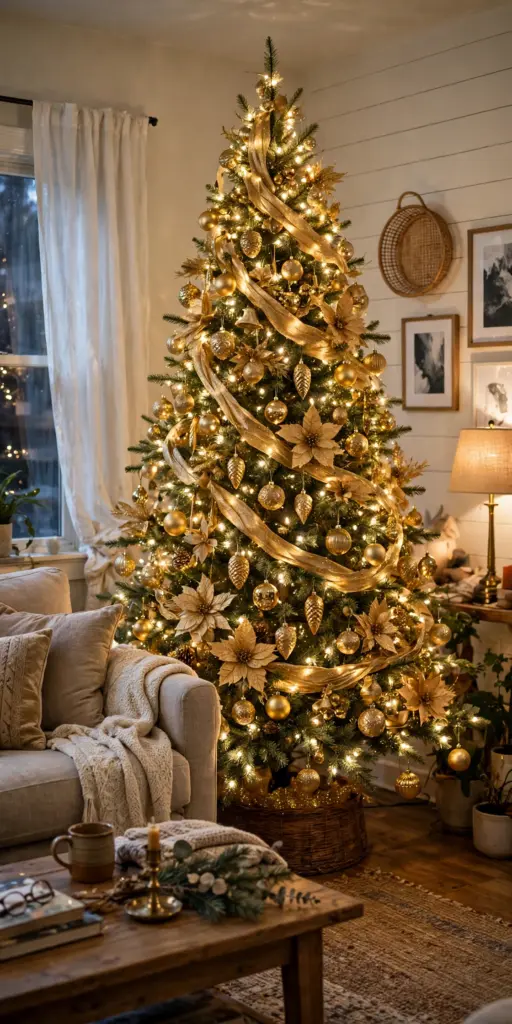
If you want your living room to look like a fancy hotel lobby, this is your tree. All gold, all shine, all glam. The secret is to use only gold in different shades and textures — shiny, matte, and glitter — so it looks rich and not boring. Do not worry if your gold pieces do not match perfectly; pale gold, yellow gold, and antique gold together actually look more expensive than one flat color.
Theme: Luxury Glam | Time to Decorate: 3 hours | Budget: $$$ (high)
What You Need
- Warm white string lights, plenty of them
- Gold ball ornaments in shiny, matte, and glitter finishes
- Big gold flower picks, like poinsettias or magnolias
- Gold ribbon, wide and glittery
- Gold bead garland
- Crystal or gold crown or star topper
- Gold pinecones and gold berry picks
- A gold or cream tree skirt
How to Do It
- Use lots of warm lights. Luxury trees glow. Add more lights than you think you need, deep inside and outside, so every gold piece shines.
- Weave the gold ribbon in big waves. Cut wide gold ribbon into long pieces and make big, rich waves down the tree. Big ribbon is the first thing people see on a glam tree, so take your time.
- Hang ornaments by finish. Mix shiny, matte, and glitter gold balls evenly. Put matte ones deep inside and shiny and glitter ones outside where the light hits them.
- Add big gold flowers. Push large gold poinsettia or magnolia picks into the tree in groups. These big flowers are the secret trick of expensive-looking trees.
- Drape the bead garland. Swag gold bead garland between the ribbon waves for one more layer of shine. Layers are what make a tree look luxurious.
- Crown it. Finish with a crystal or gold crown-style topper and a gold skirt. Turn the lights down in the room and enjoy your five-star tree.
Coastal Beach Tree with Shells and Starfish
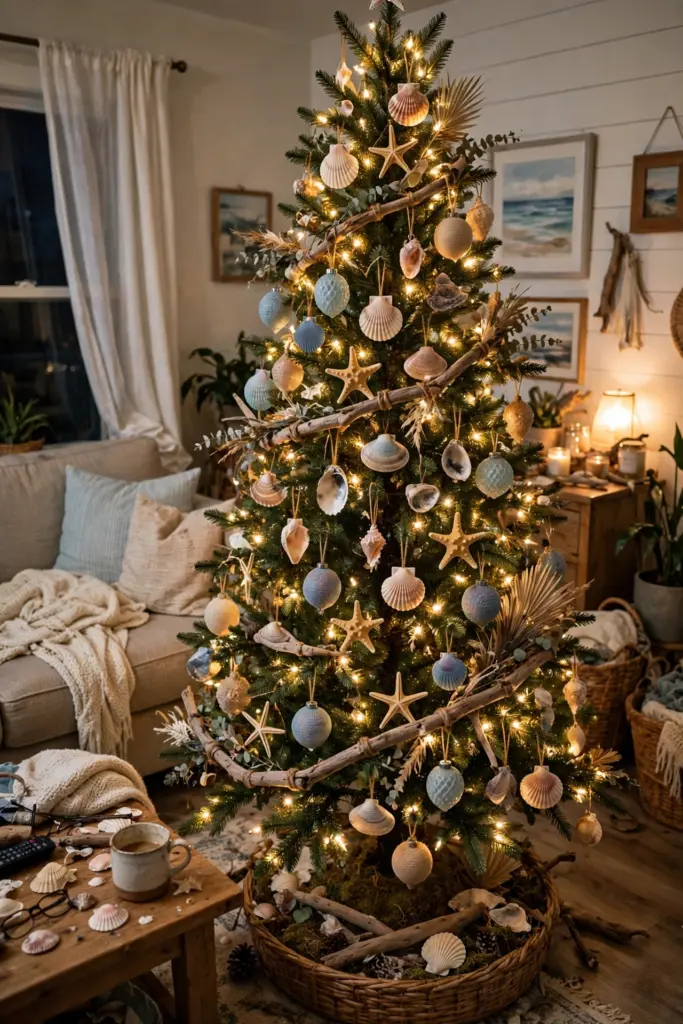
Who says Christmas has to be cold? If you live near the beach, or you just dream about it all winter long, this happy coastal tree brings a little piece of summer into December. Soft blues, sandy colors, shells, and starfish make it light, fresh, and different from every other tree on the street.
Theme: Coastal / Beach | Time to Decorate: 2 hours | Budget: $$ (medium)
What You Need
- Warm white or soft blue string lights
- Real or fake seashells and starfish
- Ball ornaments in sea blue, aqua, white, and sandy beige
- White or natural rope garland
- Driftwood pieces or a driftwood star topper
- Small glass ball ornaments that look like bubbles
- A white or burlap tree skirt, or a bucket with sand color fabric
How to Do It
- Light it soft. Wrap warm white lights, or mix in a soft blue strand for an ocean feeling. Keep the light gentle, like a sunset at the beach.
- Drape the rope garland. Wrap rope garland loosely around the tree, like rope on a boat. It gives instant beach style and costs very little.
- Hang the blue and sandy balls. Start with the biggest ornaments in sea colors deep inside, then add smaller white and glass “bubble” balls on the outside.
- Add shells and starfish. Tie shells with twine or use clips, and place starfish on strong branches all around the tree. Put the prettiest starfish in front at eye level.
- Tuck in driftwood. Small driftwood pieces pushed into the branches make the tree feel real and beachy. A few pieces are enough — do not overload it.
- Top with a driftwood star. A driftwood or white star on top and a sandy skirt below finish your beach Christmas tree. Flip-flops under the tree are optional but funny!
Buffalo Plaid Country Tree
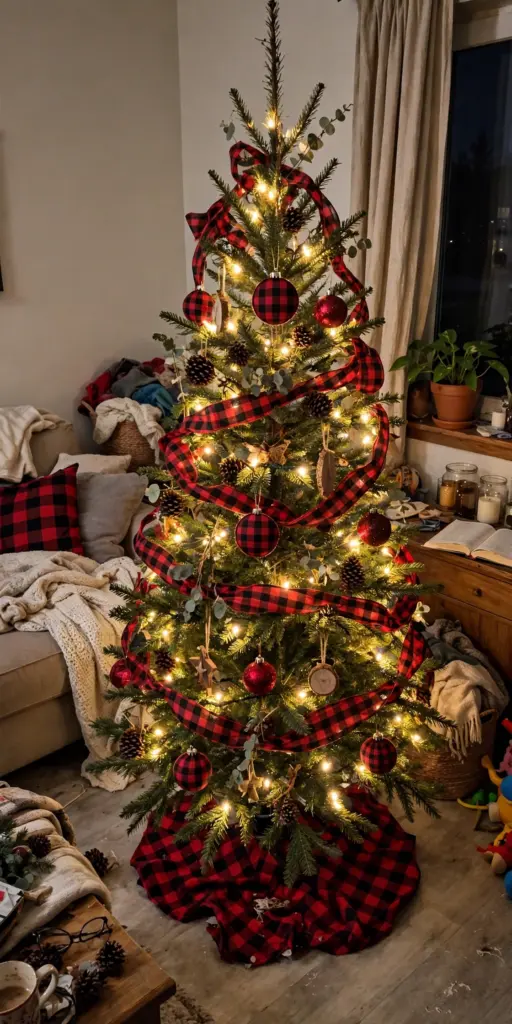
Buffalo plaid — that big red and black check — is the pattern of cozy country Christmas. This tree feels like a warm cabin, a fireplace, and a cup of hot cider. It is bold, it is cozy, and it is very easy to pull together because the ribbon does most of the work.
Theme: Country / Cabin | Time to Decorate: 2 hours | Budget: $ (low)
What You Need
- Warm white string lights
- Wide buffalo plaid ribbon (red and black check)
- Red ball ornaments
- Black or dark ornaments for contrast
- Wood ornaments and pinecones
- Small plaid bows
- A plaid blanket or fabric for the tree skirt
- A wood star or black metal topper
How to Do It
- Warm lights first. Wrap warm white lights all through the tree. The warm glow against red and black plaid is what makes this tree feel like a cabin.
- Let the plaid ribbon be the star. Cut the wide plaid ribbon into pieces and tuck them in big soft waves, or wrap it around the tree like a garland. Use a lot of it — the pattern is the whole theme.
- Hang red ornaments. Add red balls in different sizes all over the tree. Red on green with the plaid ribbon already looks like Christmas morning.
- Add dark and wood pieces. Mix in black or dark ornaments, wood pieces, and pinecones to break up the red. This keeps the tree from looking like one big red blob.
- Tie plaid bows on the tips. Small buffalo plaid bows on the outer branch tips tie the whole look together. You can buy them ready or make them in ten minutes.
- Use a plaid skirt or blanket. Wrap a plaid blanket around the base as a skirt, put the wood star on top, and your country cabin tree is ready for cocoa.
Rainbow Tree for Kids
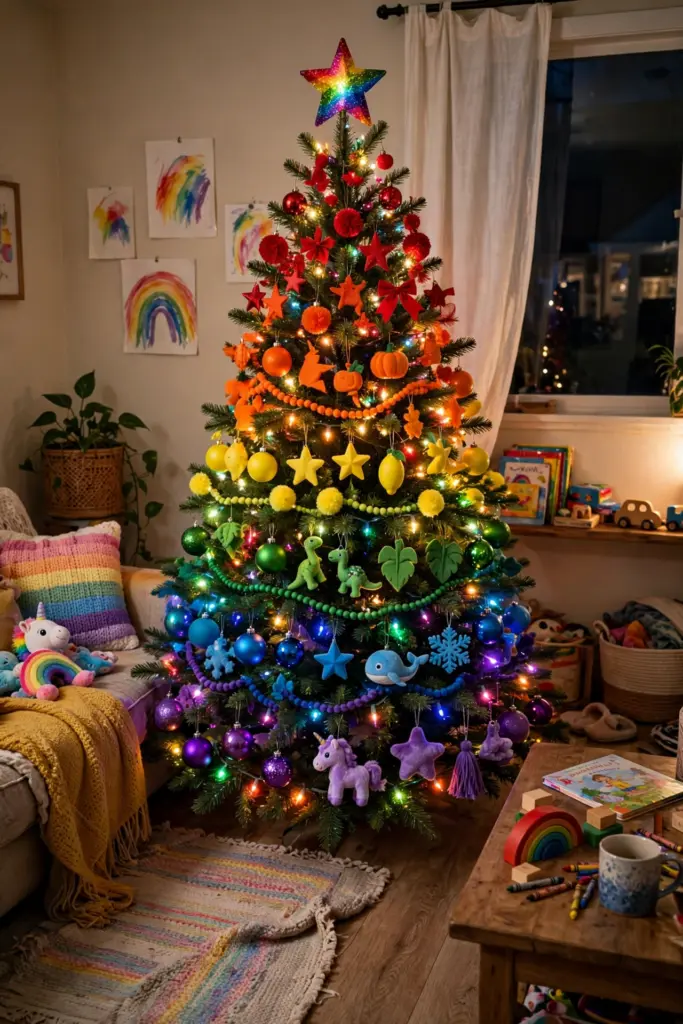
This is the tree my kids would choose every single year if I let them! A rainbow tree is full of color, energy, and pure happiness. The trick is to decorate in color bands, like a real rainbow, so it looks organized and amazing — not like a color explosion.
Theme: Kids / Fun | Time to Decorate: 2-3 hours | Budget: $$ (medium)
What You Need
- White or warm white string lights (or multi-color)
- Ball ornaments sorted by color: red, orange, yellow, green, blue, purple, pink
- Rainbow ribbon or one ribbon in each color
- Fun ornaments — unicorns, donuts, ice creams, superheroes, anything your kids love
- A white tree works great, but green works too
- A rainbow, star, or big bow tree topper
- A white or colorful tree skirt
How to Do It
- Sort your ornaments by color first. Make little piles — red pile, orange pile, yellow pile, and so on. This one step makes the whole job easy and fun for kids to help. If you are missing one color, cheap ball ornaments from the dollar store fill the gap without hurting your wallet.
- Add the lights. Wrap white lights evenly. White light keeps the rainbow colors clean and bright, like a picture in a book.
- Decorate the top band in pink and red. Start at the top with pink and red ornaments. This is the first band of your rainbow.
- Work down in rainbow order. Next band orange, then yellow, then green, then blue, and purple at the bottom. The bands do not need to be perfect lines — soft and wavy is prettier.
- Add the fun ornaments. Let the kids hang their favorite fun ornaments in the matching color areas — a donut in the pink zone, a frog in the green zone. This is their moment, let them enjoy it.
- Top it with a rainbow. A rainbow topper, a big colorful bow, or a star finishes the tree. Take a photo — this is the tree they will remember when they grow up.
Burgundy and Champagne Elegant Tree
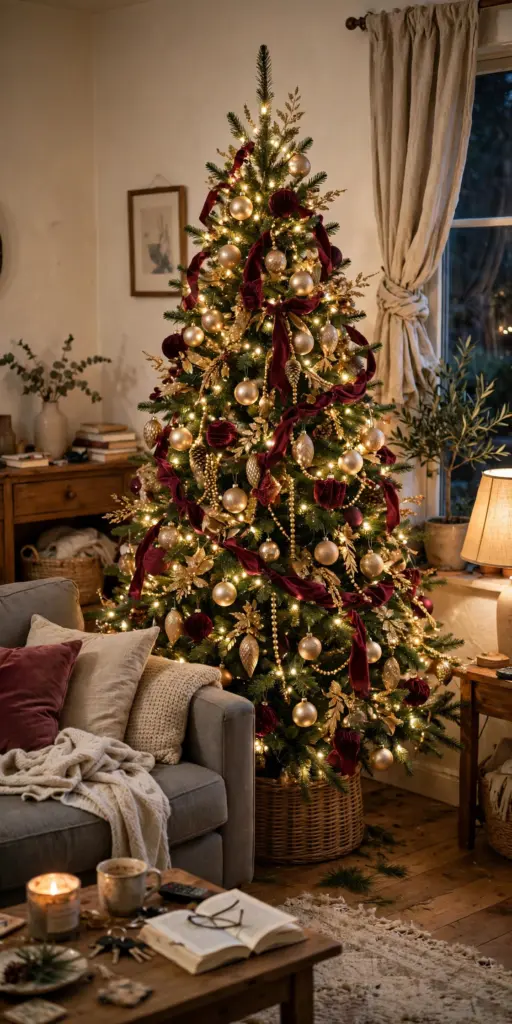
Burgundy and champagne is the grown-up, romantic version of red and gold. The deep wine color looks rich and soft, and champagne adds a gentle shine that is not too bright. This tree is perfect for a dining room or a quiet, elegant living room.
Theme: Elegant / Romantic | Time to Decorate: 2-3 hours | Budget: $$-$$$ (medium to high)
What You Need
- Warm white string lights
- Burgundy ball ornaments, matte and shiny
- Champagne gold ornaments (soft, pale gold)
- Cream or ivory ornaments
- Burgundy velvet ribbon or champagne ribbon
- Burgundy flower picks, like roses or peonies
- A champagne star or crystal topper
- A cream or burgundy velvet tree skirt
How to Do It
- Set the mood with warm lights. Wrap warm white lights deep and even. For elegant trees, soft light is everything — it makes burgundy look like velvet.
- Add the ribbon in soft falls. Let velvet burgundy or champagne ribbon fall in long, soft, straight waves from top to bottom. Elegant ribbon hangs down, it does not wrap around and around.
- Hang burgundy deep, champagne outside. Put big burgundy balls close to the trunk for rich color inside, then hang champagne and cream ornaments outside where they catch the light.
- Balance the colors in thirds. Think of the tree in three parts — burgundy, champagne, cream — and keep them mixed evenly. Step back often and fix any spot that is too dark or too light.
- Add the flower picks. Tuck burgundy roses or peonies in small groups, mostly in the middle and lower parts of the tree. Flowers make this tree feel romantic and expensive.
- Finish soft and simple. A champagne star on top and a velvet skirt below. Light a candle nearby, pour something nice, and enjoy your elegant evening tree.
Snowy Flocked Tree with Red Berries
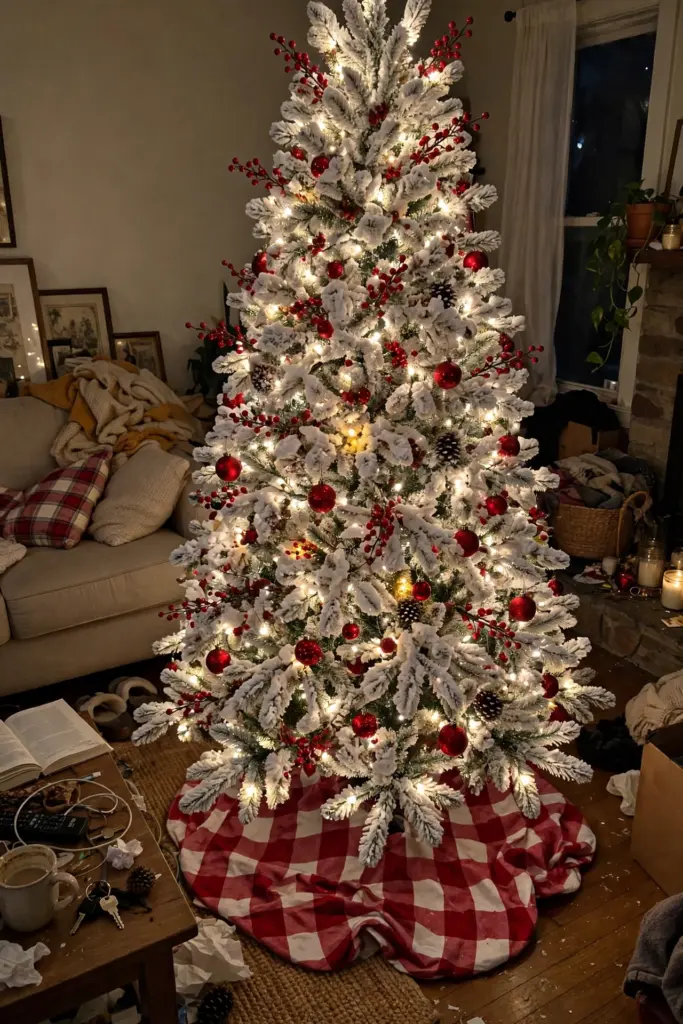
A flocked tree already looks like it stands in a snowy forest — white, soft, and magical. Add red berries and a few red ornaments, and the colors pop like a Christmas card. This is one of the most photographed styles for 2026, and it is easier than it looks. If you already have a green tree, do not buy a new one — a can or two of flocking spray from the craft store gives you almost the same snowy look for a few dollars.
Theme: Snowy / Classic | Time to Decorate: 1-2 hours | Budget: $$ (medium)
What You Need
- A flocked (white snow) Christmas tree, or flocking spray for a green tree
- Warm white string lights
- Red berry picks and berry garland — lots of them
- Red ball ornaments, only a few sizes
- White ornaments for soft spots
- A little red ribbon, or none at all
- A red star, cardinal bird, or red bow topper
- A white or red tree skirt
How to Do It
- Fluff the flocked tree gently. Flocked branches drop a little white powder, so open them slowly and shake the tree outside first if you can. Then shape it full and round.
- Add warm lights. On a white tree, warm lights look like little golden suns in the snow. Wrap them evenly, but you need fewer than on a green tree because the white branches reflect light.
- Put berries everywhere. This is the main decoration, so be generous. Push red berry picks all over the tree and drape berry garland in soft swags. Red on white is the whole magic here.
- Add a few red ornaments. Hang red balls mostly in the middle area of the tree, not too many. On this tree, empty white space is beautiful — do not cover all the snow.
- Soften with white ornaments. Add a few white balls in spots that look too bare or too red. This keeps the tree calm and snowy.
- Top it red. A red star, a sweet cardinal bird, or a big red bow on top, with a white skirt like fresh snow below — your Christmas card tree is done.